

Have you ever wanted wildcard entries in the/etc/hosts file? What about CNAME, TXT, or MX records? Do you want to run a DNS server for development? Cumbersome to update upstream name servers when switching networks? All of the above can be solved by running your CoreDNS locally. Yes, locally, not talking about Kubernetes this time 🙂
Table of Contents
Installation
The easiest way to run CoreDNS on Windows and serve requests on localhost is to run the following script. The repository contains two preconfigured zones, k8s.local and docker.local, with wildcard A record pointing at 127.0.0.1 so that we can easily access Docker Desktop deployed servises. The installation script creates the required virtual network adapter, and a scheduled task reloads the configuration when needed. Finally, it runs docker-compose to start CoreDNS itself.
Prerequisites: Hyper-V, Docker Desktop, PowerShell 7, Git
# Get all the files
git clone https://github.com/piotr-rojek/devopsifyme-dns.git

# Register Virtual Network Adapter
# Run as administrator
pwsh -c ./Register-DevOpsifyMeDns.ps1

# Start the DNS server on Docker
pwsh -c ./Start-DevOpsifyMeDns.ps1

# Test - you should get 127.0.0.1 in response
nslookup test.k8s.local

And that’s it! You now have a Core DNS running locally and acting as your primary DNS server.
Configuration
First of all, the good news is that you can still use /etc/hosts for simple A/AAAA records! Although when you need more power, you can edit zone files (ending with *.db in the config directory). Look at the sample Zone file – Wikipedia to get an idea of the file structure and how to add more records.
Moreover, you can edit Coreconfig to include more zones or plugins to tailor the server’s behavior to your needs. Please read more about the syntax and possibilities here: CoreDNS: DNS and Service Discovery
Finally, run pwsh -c ./Start-DevOpsifyMeDns.ps1 to apply the changes.
Use Cases
The most common use case is the need for wildcard entries. Nowadays, it is relatively easy to add a simple record mapping in /etc/hosts file that defines A/AAAA records, but what if we want to write something more complex like a rule saying: “all DNS requests ending with localhost shall point at 127.0.0.1 (*.localhost => 127.0.0.1)? When running Kubernetes, it is convenient to define “*.k8s.local => 127.0.0.1” so we can quickly deploy an access app via it’s ingress and host name mapping.
Now imagine you are developing a new service and decide to run your own Public DNS Zone (Azure) as you should, but it isn’t attached anywhere yet. We often hardcode /etc/hosts entries to reach our reverse proxy. With CoreDNS, we can point at the cloud DNS resource in Azure, AWS, or Google Cloud, keeping configuration in one place for the whole team.
Another frequent need is to test application behavior with records other than A/AAAA. This can happen when writing a specialized application that logic relies on, for example, MX or TXT records content.
Possible Other Solutions
- Update /etc/hosts manually for every entry we need
- Add required entries on corporate DNS server
- Add required entries on home DNS server
- Add required entries on localhost DNS server
The host file is prominent and used by most people due to its availability and simplicity. The biggest drawback is that with time this file tends to be a spaghetti remembering long-time forgotten projects. It also requires us to elevate to Administrator each time we make an edit, which might not be readily available in all environments. Finally, it only supports A/AAAA record, not even a CNAME 🙁
The corporate DNS is perfect for well-standardized environments. For example, if we have a lot of developers working locally with Kubernetes, it should be easy to agree to introduce *.k8s.local => 127.0.0.1 mapping that would work for most developers and projects. This approach does not work, though, when developers require to make changes ad-hoc and frequently.
The home DNS server approach works well if we have a place to host it 😉 It could be our home server, router, or raspberry pie. Especially if we already have a server machine working 24/7, it may seem like a low-hanging solution. The biggest drawback of this approach is that it only works at our home network and does not work at the office or while traveling.
The localhost DNS server is perfect for those who wish for complete control and an isolated solution that affects only a single machine. Two problems to overcome: Windows already listens on port 53, and how do we configure forwarding DNS servers, especially for a laptop that frequently changes networks? Luckily, it is nothing that cannot be addressed and is the main subject of this post 🙂
High Level Solution
The solution is to configure a new virtual network adapter, set a well-known IP address we can bind to, and configure the adapter’s DNS to point at the adapter’s IP address. At this point we have an adapter not connected to anything, which advertises its own DNS server that we haven’t even started yet.
With an adapter having a well-known IP address, we can start any DNS server on our host (such as CoreDNS) and bind it to that exact IP. This ensures that the server is reachable ONLY from within the host on this exact IP address, not from the outside. CoreDNS shall forward all queries for non-local zones to the DNS servers on the second preferred and connected network interface.

Problem #1 – port 53 not available?
Windows has a service called Internet Connection Sharing that binds to 0.0.0.0:53/UDP that acts as a DNS relay for WSL2 distributions, including Docker Desktop. Therefore disabling it is not an option, making hosting your DNS server a little more challenging.
What is more, selecting a different port for a DNS server on another UDP port sounds like a good idea, but in practice, it is only suitable for manual tests with nslookup – at least on Windows 😉
The solution is relatively simple; we can bind/listen on a specific adapter, still having ICS service bound to all the interfaces (0.0.0.0). Note that ICS is smart enough not to respond to requests on an interface it is not supposed to handle. Therefore we can have multiple listeners on an identical port 🙂 We only need to know the interface IP address of an adapter, as we want to bind only to a specific adapter.
Problem #2 – how to prioritize our DNS?
Knowing that each network adapter can provide multiple IPv4 and IPv6 DNS servers, you may wonder how Windows will know that our DNS server is the one to query. Well, having plenty to choose from, there is an algorithm 😉
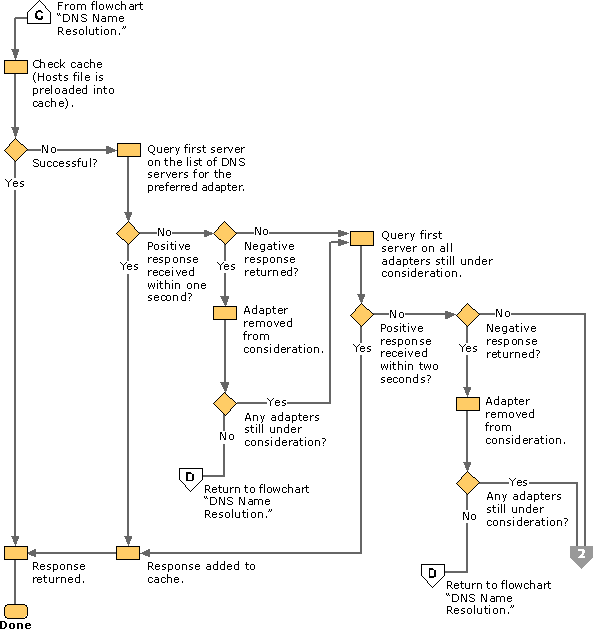
OK, but how do we make our adapter the preferred one? Since Windows 10, an interface (IPv4/IPv6 on an adapter) with the lowest Metric value is preferred. Usually, metrics are set automatically, but since we want to ensure that our local DNS is always the preferred one, we can fix it to something low, like 2.
Now we have our adapter with local DNS preferred, so all the DNS queries are being sent first to us. But what if we are down? Do we lose internet connectivity? Luckily, it is covered by Windows, which still queries /etc/hosts, then us, and continues with other adapters if needed.
Problem #3 – changing networks
The next problem is essential. When changing networks, connecting to VPN, connecting to a different WiFi, or plugging in a cable – we can get a different DNS from DHCP. We could hardcode Clourdflare’s/Google’s 1.1.1.1, 4.4.4.4, or 8.8.8.8, but not if we still want to access corporate resources. Therefore, generally speaking, it is not a good idea.
There are a lot of tutorials on the Internet that recommend setting our local DNS to relay unknown zones to DNS servers that were once fetched from DHCP, which is good. Afterward, they advise disabling DHCP on the network adapter and manually setting the DNS server to 127.0.0.1. And this is where it feels not right.
As a solution, we react to “network connected” and “network disconnected” events, triggering a CoreDNS configuration update, which will ensure that proper DNS servers are used for forwarding. These events have IDs 10000 and 10001 and can be found under Microsoft-Windows-NetworkProfile/Operational node in the Windows Event Log. We can easily set up this logic using Windows Task Scheduler. Last but not least, manual DNS is ONLY set on our virtual network adapter, while other adapters are not altered.
Summary
We have a friendly, flexible solution that does not require us to modify multiple adapters to force our DNS server, nor does it remove DHCP functionality. It also plays well with Windows’s DNS prioritization algorithm and ICS scenarios, including WSL2 and Docker Desktop.